Introduction
The pan's been heating for three minutes. You drop in a cold cube of butter straight from the fridge, and instantly—violent sizzling, dark brown specks forming before you can even grab your spatula. Your fish fillet goes in next, sticking immediately to those burnt bits. The kitchen fills with that acrid smell that's not quite toasted, not quite caramelized. Just burnt.
This happens in home kitchens constantly, and it's one of those small timing mistakes that separates okay meals from great ones.
The science behind the sizzle
Butter isn't just fat. It's roughly 80% butterfat, 16% water, and 4% milk solids—those proteins and sugars that brown and burn. When cold butter hits a surface that's already 350°F or hotter, those milk solids don't have time to distribute. They hit the metal, scorch instantly, and create those dark flecks that taste bitter.
Room temperature butter, by contrast, melts gradually. You can watch it foam, see the bubbles settle, gauge when it's ready. The milk solids have time to separate and brown evenly—or you can remove them entirely by swirling and watching for that nutty aroma that signals brown butter.
Temperature shock matters. Cold butter also lowers the pan's heat suddenly, creating uneven hot spots. One side of your chicken breast sears beautifully while the other steams in pooled liquid.
What actually happens in the pan
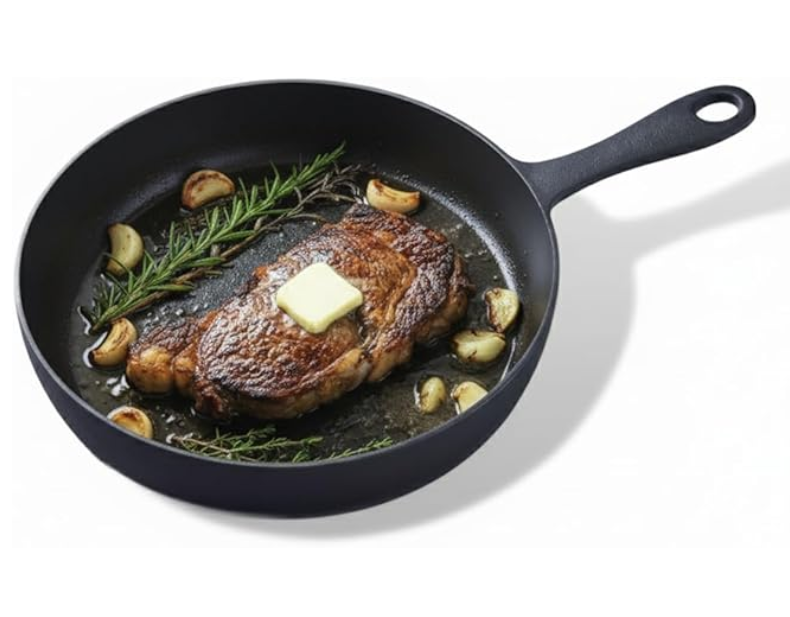
Picture this: you're making a simple pan sauce after searing steak. The pan's ripping hot, fond is building, everything's going perfectly. You toss in cold butter to finish the sauce. It liquefies in seconds, but those milk solids burn on contact with the metal. Your sauce tastes sharp instead of silky. The gloss turns grainy.
Or you're sautéing mushrooms. Cold butter goes in first, the pan's too hot, and instead of gentle sweating, the mushrooms release all their liquid at once. They boil instead of brown. Rubbery texture, no caramelization, watery pan.
The order matters as much as the temperature. Professional kitchens often heat the pan, add oil first for high-heat cooking, then swirl in butter at the end for flavor. The oil's higher smoke point protects the butter from burning.
When cold butter actually works
Baking's different. Cold butter cut into flour creates flaky layers in biscuits and pie crust—you want those solid fat pieces. Some pan sauces benefit from cold butter whisked in at the very end, off heat, creating an emulsion. French technique calls this "monter au beurre." But the pan must be below 160°F, not screaming hot.
For steak, some cooks baste with cold butter in the final minute, but they tilt the pan, spoon constantly, never letting it sit and scorch. It's controlled chaos, not a toss-and-hope situation.
The right way to start
Let butter sit on the counter for fifteen minutes. It should dent easily when pressed but still hold its shape. Add it to a pan over medium or medium-low heat. Watch it melt and foam. When the foaming subsides and you smell that nutty aroma starting—not burnt, just warm and toasted—that's your window.
For delicate fish or eggs, even lower. Butter should melt slowly, coating the pan in a thin, even layer. You're looking for shimmer, not smoke.
If you need high heat—searing, stir-frying—skip butter entirely at first. Use ghee, clarified butter, or neutral oil. Finish with a small knob of regular butter once you've reduced the heat, letting it melt into whatever you're cooking for flavor without the burnt bitterness.
Quick fixes when you've already burned it
If you see those dark specks forming, don't try to salvage it. Wipe the pan completely, start fresh. Burnt milk solids only get more bitter as they cook, and they'll coat everything else you add.
Keep a small dish of room-temperature butter near the stove during cooking. Makes it easier to grab the right amount without running to the fridge mid-recipe. Some cooks portion it into tablespoon-sized pieces on parchment paper, leaving them out during prep.
Why this matters more than you think
That bitter, burnt flavor doesn't just affect butter—it transfers to everything in the pan. Your sauce, your protein, your vegetables. It's the difference between a dish that tastes restaurant-quality and one that tastes slightly off, slightly harsh, without knowing exactly why.
Once you start timing butter correctly, you'll notice how much more control you have. Gentler browning, better flavor, nothing sticking or scorching unexpectedly. It's a small shift that changes everything else downstream.